
INTRODUCTION
This article will cover a simple, planned mining method that will allow you to view every block within a pre-defined area. This technique minimizes on inefficiency by reducing walking distance to the smallest distance for the amount of blocks mined, and there is no need to backtrack or walk over previously mined areas to start a new branch.
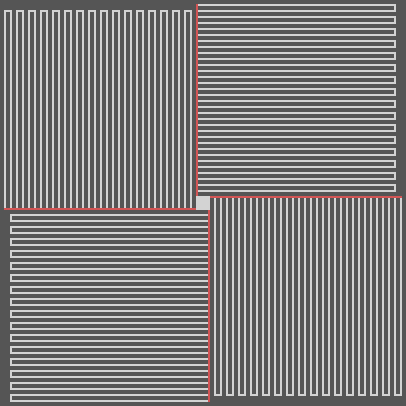
The finished product will look something like this. Light red squares are the 4 legs of the mine, and the light grey squares are the branches. The light blue squares are the staging room, and the center brown square is for a ladder or staircase.

STEP 1
For the first step you are going to want to mine out your staging room. I like to make it 7x7. Then, in a left-hand corner, as shown, mine a tunnel 2 blocks high and 1 block wide. Mine for 3 meters (1 block = 1 meter), and you will be standing on the dark green square. At this point, you will mine 2 more meters while standing on the dark green block. Then, turn right, and mine your first branch.
You can make your branches as long as you like, but I recommend you make them at least 100 meters long. If you are a casual/light player, you might never finish the mine at this length. If you play several hours a day, you might want to make it 200 meters long. And, if you are planning on playing this world for a long time, and want to have just 1 mine at your base, you could go for 300-500 meters long.
However long you choose, when you reach the end of your branch, turn left and mine 3 meters. You will now be standing on the dark red square. From this point, you will mine a 'window' that is 2 blocks deep, on the same level as your eyes, not your feet. Place a torch in this window. This marks the distance you need to mine to on the next branch, so you don't have to count anymore.

STEP 2
Now, still standing on the dark red square, turn left and mine until you connect with the light green space you mined out earlier. This is your cue that you are done with this branch. If you mined 100 blocks in each direction, you will see that you have mined 512 blocks (206 meters, 2 blocks high), but you only have to walk 6 meters to be in your staging room again. This is one of the reasons this technique is so efficient.
Now, you will repeat STEP 1 and STEP 2 to make the next branch.

STEP 3
Continue this process until the main leg of this quadrant is as long as your chosen distance for your branches. So if each branch is 100 meters, continue until your main leg is 100 meters long.

FINISHING THE MINE
This image is just an example of how the system works, scaled down to be easily viewable. If you have completed all 4 quadrants of your mine, you will end up with something like this.
CONCLUSION
This style of mining will either mine, or expose, 100 % of any ore within the square mining area. If you don't actually hit the ore while mining it will appear in the wall on one side or the other, as walls are only 2 blocks thick.
The pros of using this method are that it greatly compacts your mine, making it so you can more quickly get back to your base, or back to the end of your mine. It also reduces the save file size, since the game won't have to generate any more areas than totally necessary for your needs.